Leather Kitchen Banquette Restoration in New York
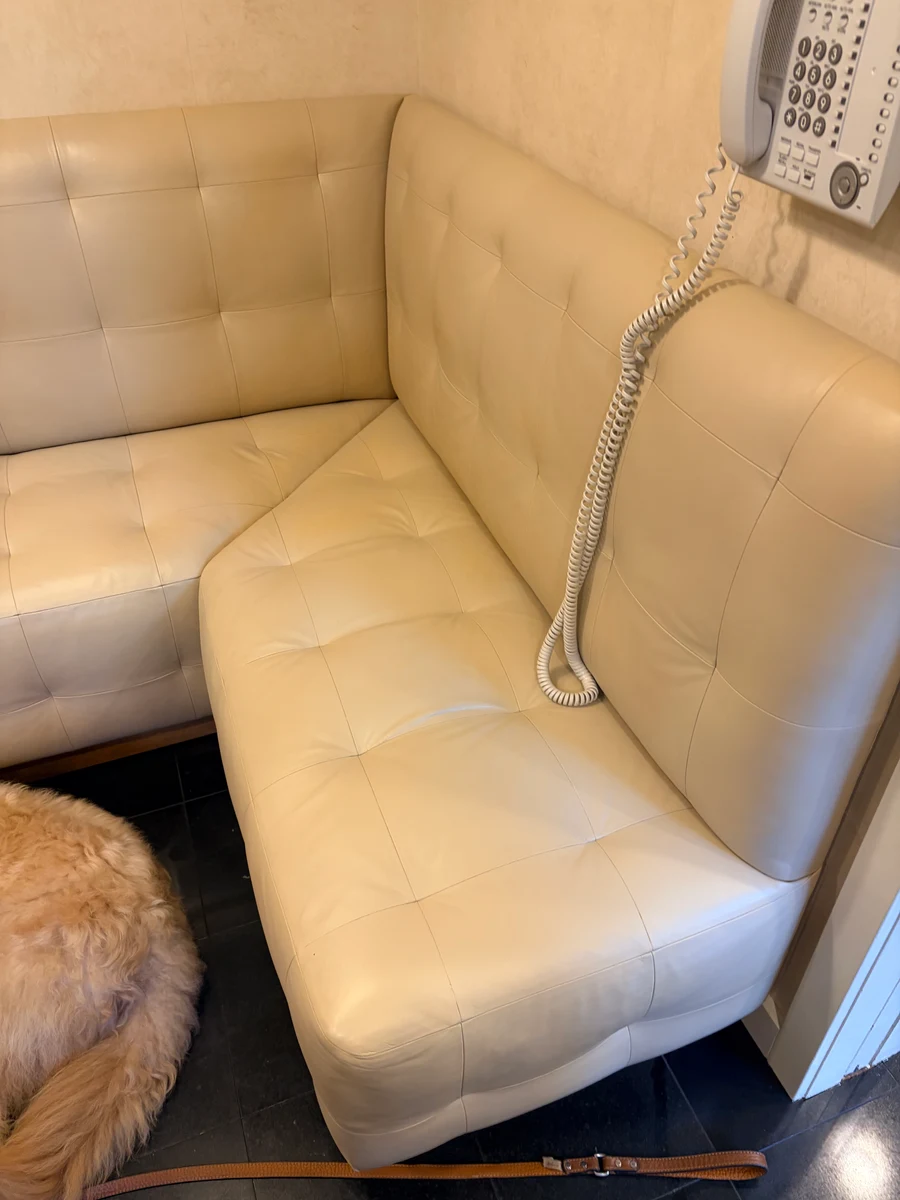
A built-in cream leather kitchen banquette had developed noticeable surface cracking, a yellowed finish, and color loss across the seat panels from years of daily family use. The structure was completely sound. The leather was salvageable. We cleaned it thoroughly, repaired the cracked surfaces, developed a custom cream color match, and restored the banquette to a clean, uniform appearance on-site — in a single visit, without touching the frame.
Project Overview
The Banquette
A built-in kitchen banquette is not a piece of furniture in the usual sense. It is part of the room. The frame is built to fit a specific corner or wall, typically on a wood structure that is anchored to the floor, the wall, or both. The leather is upholstered over that frame in place. The whole assembly — seating, backrest, the L-shaped corner — is one continuous built-in feature of the kitchen.
This design creates seating that a conventional sofa cannot replicate: it fits the exact dimensions of the space, it integrates cleanly with the architecture, and it typically seats more people around a dining table than individual chairs allow. For a family kitchen, a well-designed banquette becomes one of the most-used pieces of seating in the home.
Cream leather, specifically, is a demanding choice for kitchen seating. It shows soiling more readily than darker tones, is more sensitive to the oils in body contact and food proximity, and requires more consistent conditioning to maintain its color and flexibility. Without routine care, cream leather on a high-use seat follows a predictable path: soiling accumulates in the finish, the leather dries out as conditioning is skipped, the surface begins to crack under repeated flexion, and the original clean white gradually shifts toward a dull yellow-tan. That is the condition this banquette was in when we arrived.
Condition on Arrival
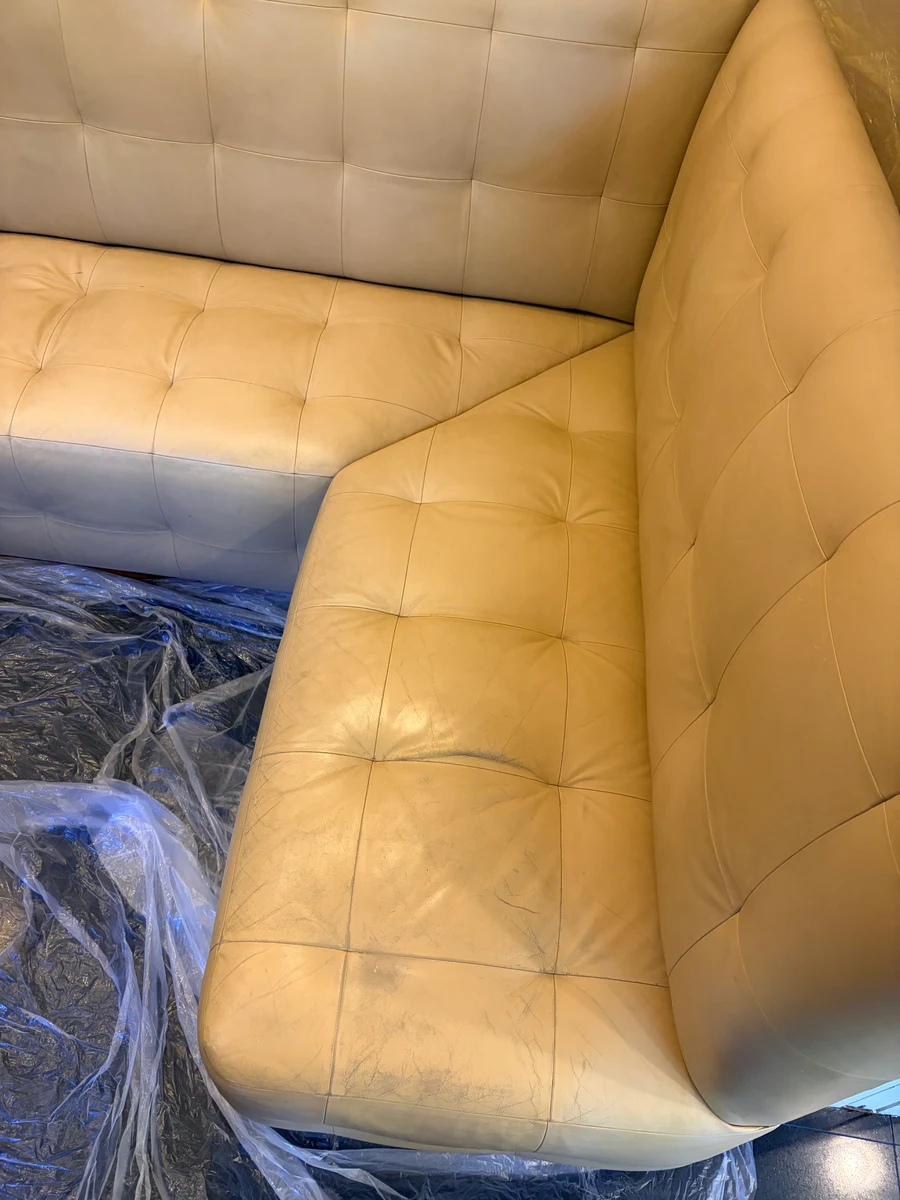
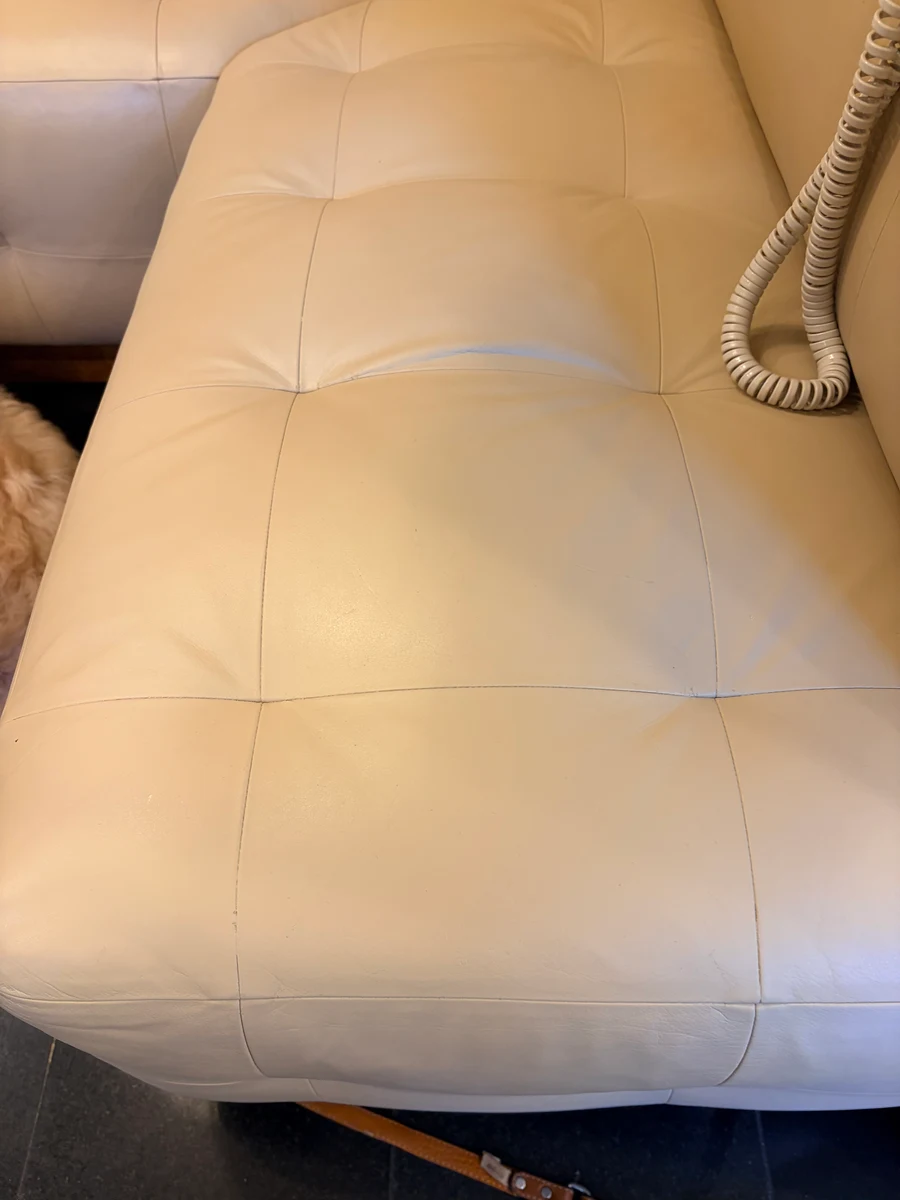
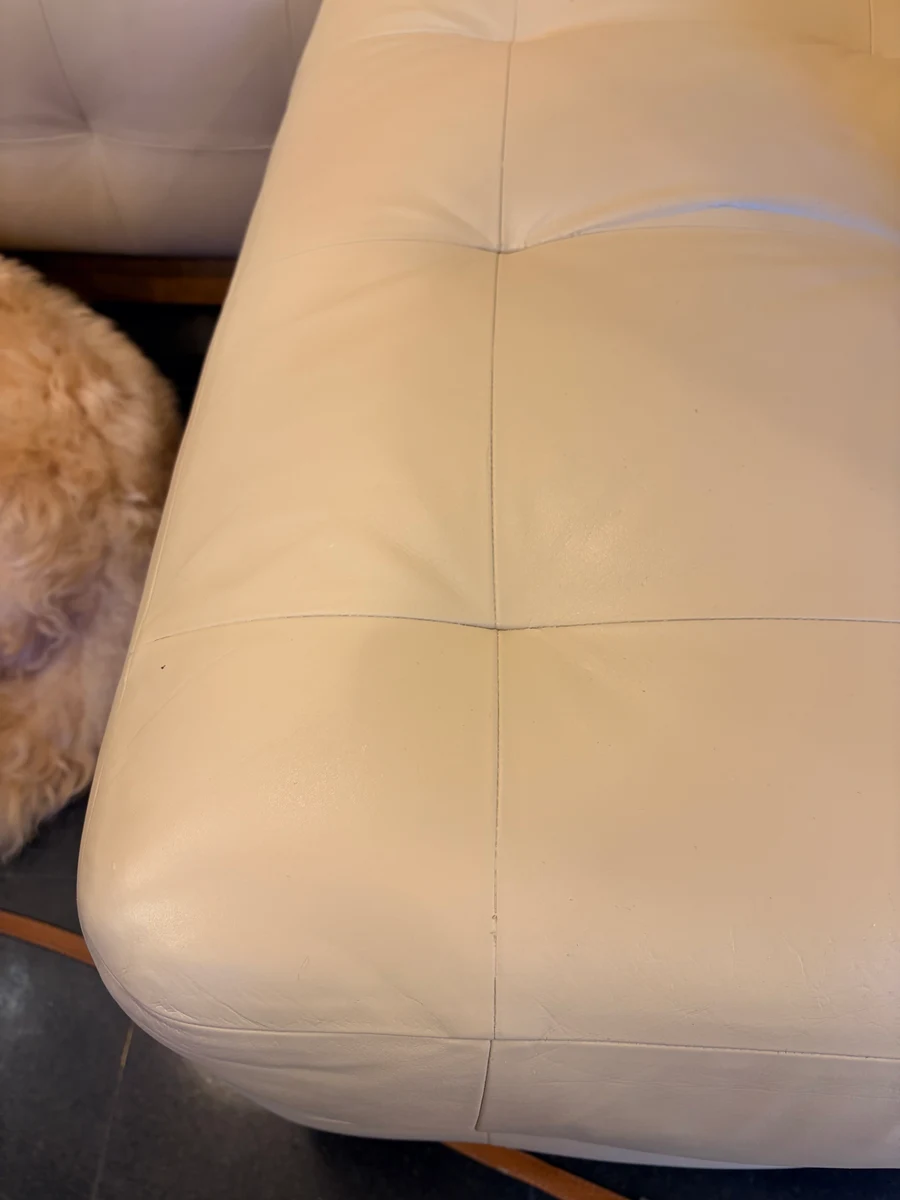
The banquette had not received professional cleaning or conditioning in some years. The leather had developed a warm, yellowed cast across the seat surfaces — noticeably different from the original cream visible in the less-exposed areas of the backrest. This yellowing is surface contamination: oils absorbed into the finish, combined with some degree of dye fade in the most heavily used sections, had shifted the color away from its original tone.
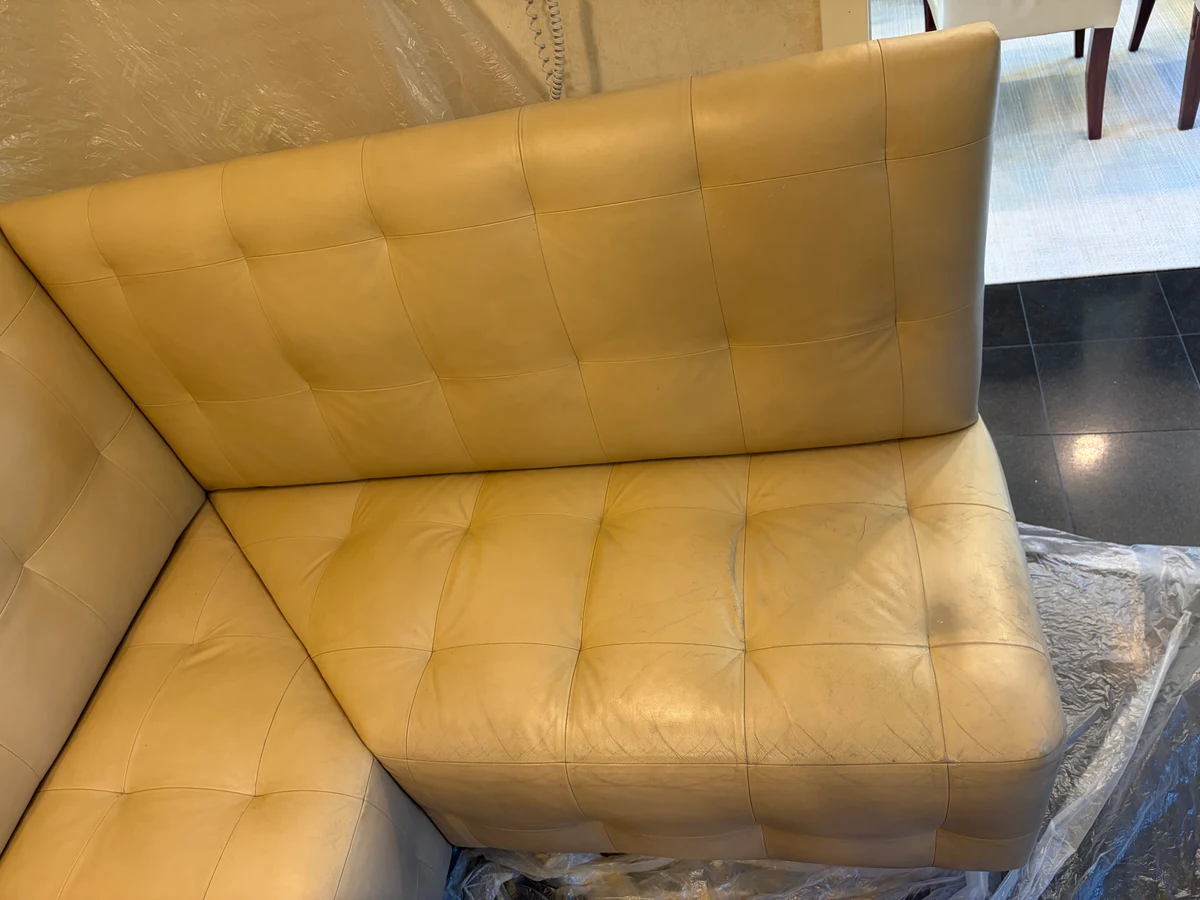
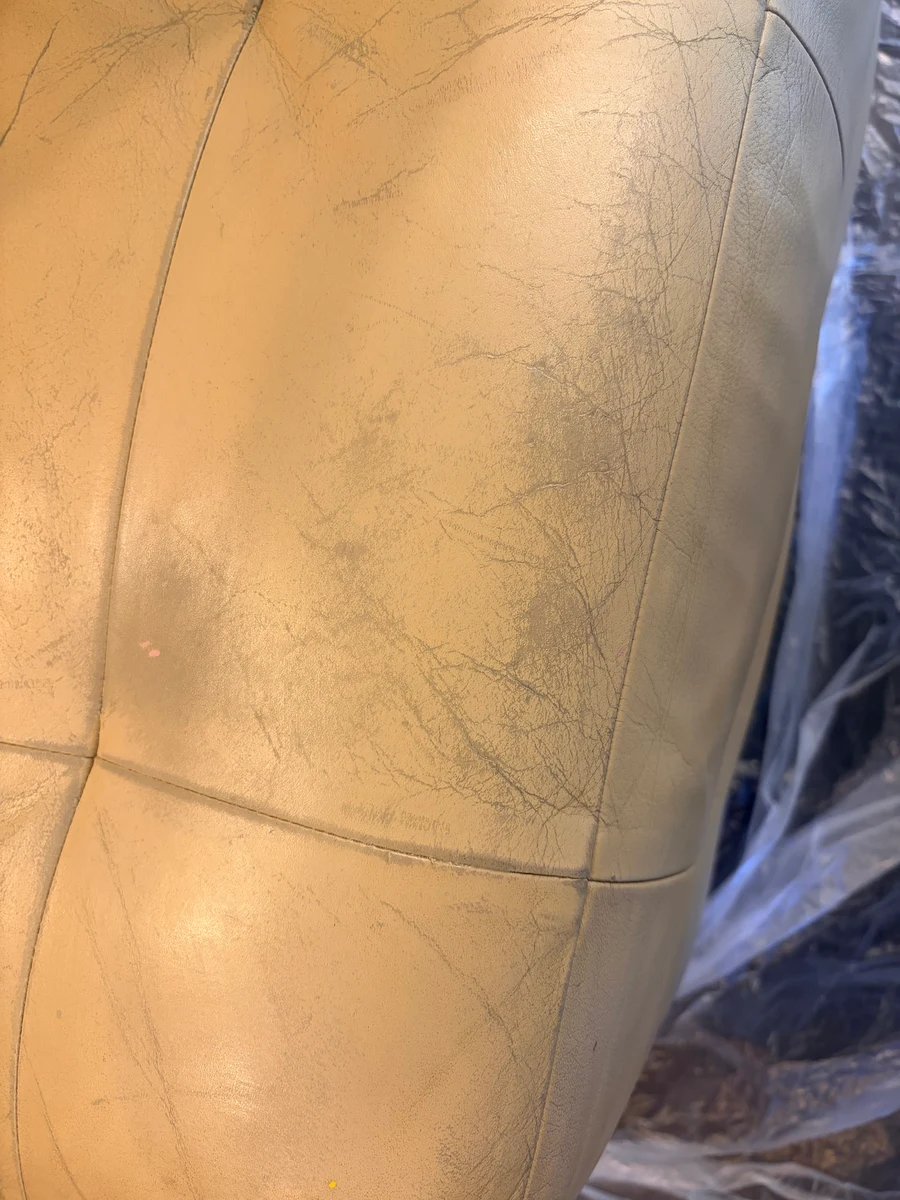
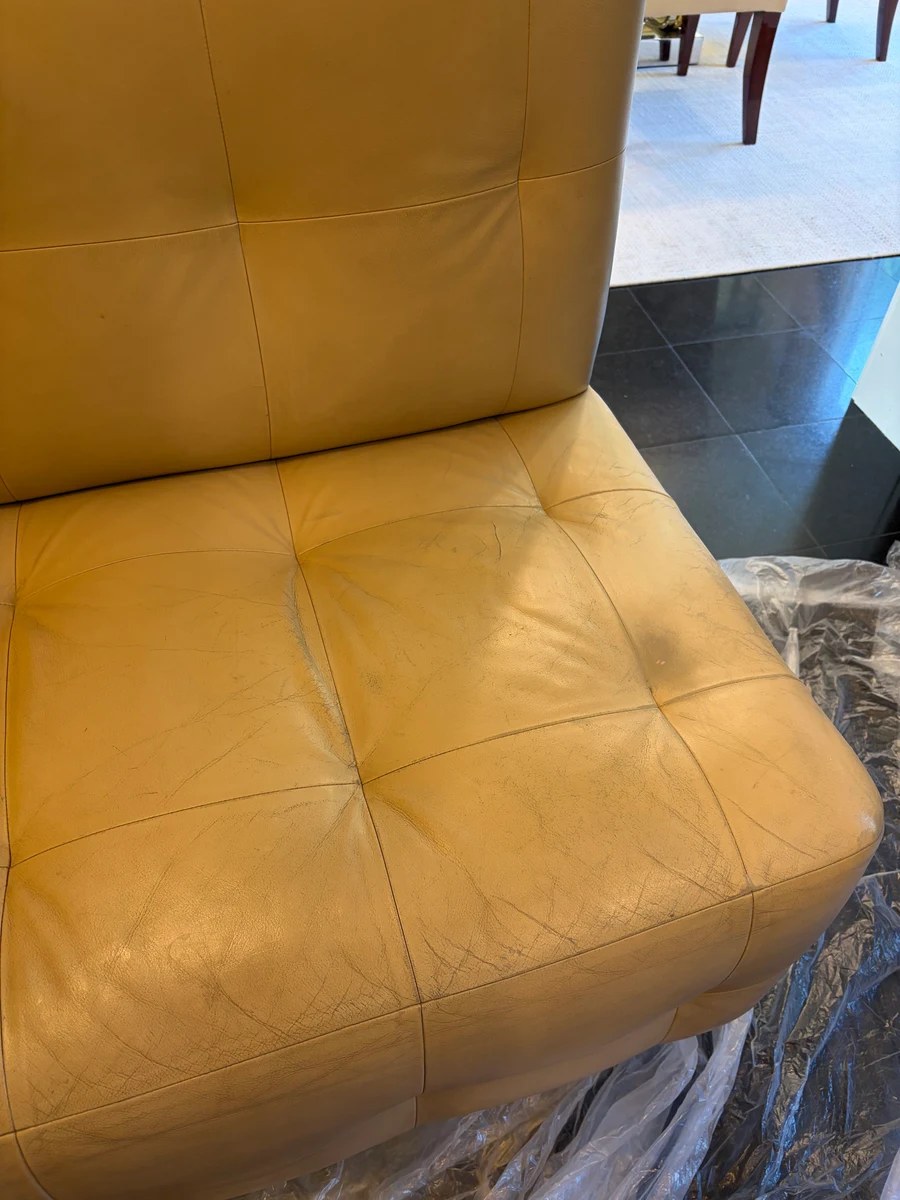
The cracking ranged in severity across the banquette. The seat panels — where body weight is concentrated and the leather flexes repeatedly with every use — showed the most developed damage: a visible network of surface cracks that had formed as the finish dried out and lost flexibility. On the seat edges and corner junction, the cracking was deepest. Across the backrest panels, a finer surface crazing was distributed over a large area — the kind that develops slowly over time and becomes noticeable only when it has progressed across the whole surface.
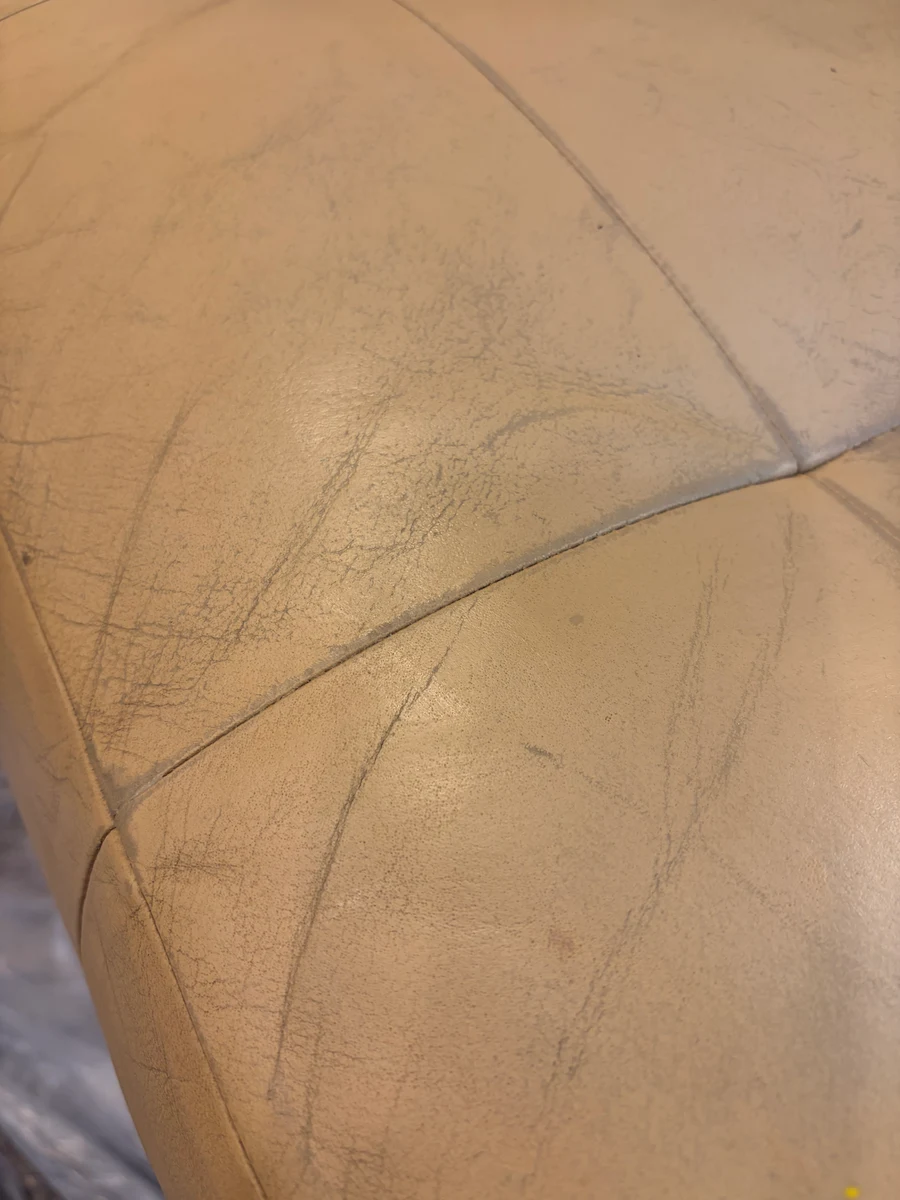
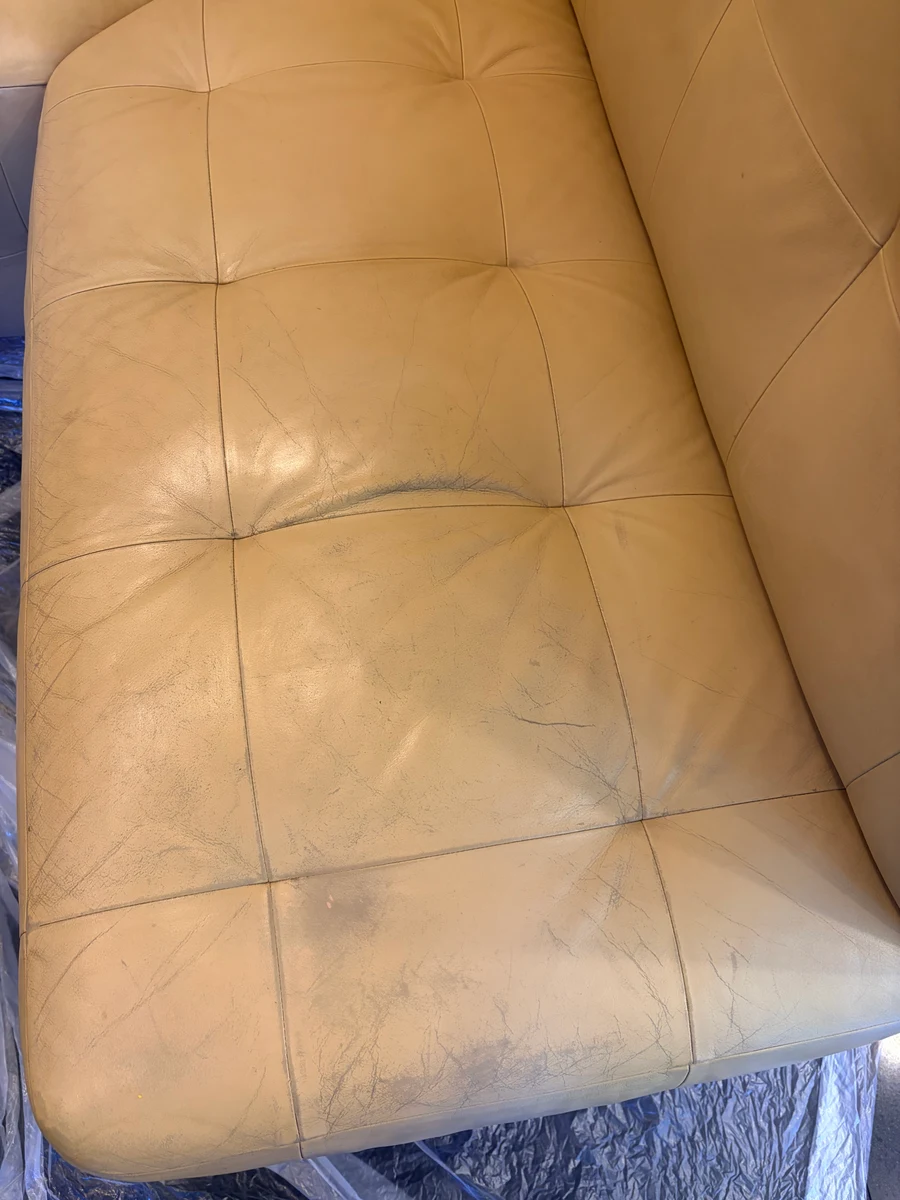
- Surface cracking: Developed across the seat panels and corner sections where leather had dried out and lost flexibility from years of use without conditioning. The crack network ranged from fine crazing on the backrest to more pronounced fissures on the seat surfaces.
- Yellowing and color loss: The original cream had shifted to a warm yellow-tan on the seat panels. The discoloration came from absorbed body oils and accumulated soiling in the finish layer, combined with some dye fade in the highest-contact areas. The original color was still visible in the less-exposed backrest panels.
- Embedded soiling: Years of kitchen use had deposited oils, food residue, and surface grime into the finish. This contamination had to be fully removed before any restoration work could proceed — applying new color over contaminated leather produces uneven bonding and premature failure.
Why Restore Instead of Replace
A built-in banquette creates a specific problem when it deteriorates. It is not a sofa you can take out of the room and send to an upholsterer. The structure is part of the architecture — which means re-upholstery requires either working in place, which is difficult and labor-intensive, or partially disassembling the unit to access the leather properly. In New York, this kind of work runs from several hundred to several thousand dollars, requires extended access to the kitchen, and ends with a replacement material that will not look or feel like the original leather.
There is also no identical replacement available. Leather is a natural material with a specific grain pattern, softness, and character that develops over time. A new piece of leather sourced to match will be close, but it will not be the same. On a continuous surface like a banquette where the eye has a large reference area, the difference between old and new leather is often visible.
Restoration avoids all of this. The original leather is treated in place. Nothing is disassembled. The kitchen is accessible throughout the working day. The original leather — which has already conformed to the frame, developed the correct softness, and has a grain pattern that fits the piece — is preserved. Where the frame and foam are structurally sound, as they were here, restoration is the correct approach.
The Restoration Process
The work was completed in a single on-site visit. Plastic sheeting was laid on the floor around the banquette to protect the tile during the restoration. The work moved section by section — cleaning and treating each panel in sequence before moving to color application.
Deep Leather Cleaning
All leather surfaces were cleaned thoroughly using professional leather cleaning compounds before any restoration work began. Cream leather accumulates soiling in its finish more visibly than darker colors — years of embedded body oils, kitchen residue, and airborne grease had darkened and yellowed the surface. This cleaning stage is not cosmetic prep work; it is essential. Color applied over a contaminated surface does not bond correctly and will lift or streak. The surface must be genuinely clean before anything else can proceed.
Embedded Oil & Residue Removal
A degreasing treatment followed the initial cleaning, specifically targeting the seat panels where body contact is highest and oil absorption deepest. In kitchen seating, cooking oils and food residue add a layer of contamination not found on living room furniture. This stage removes what general cleaning cannot reach — the oils that have migrated into the finish layer and are causing the yellow cast. Once the degreasing was complete, the leather was inspected under consistent light to confirm all surfaces were uniformly prepared.
Surface Preparation
After cleaning and degreasing, each leather panel was assessed for surface condition. The seating areas had developed the most significant cracking — the leather finish had dried out and fractured under repeated flexion from body weight. The backrest tufted panels showed finer surface crazing. All affected surfaces were lightly prepared to allow repair compounds and color to bond correctly to the existing leather. No material was removed beyond the compromised surface layer.
Crack Repair & Flexible Filling
The cracked areas across the seat panels were filled with a flexible leather repair compound. This material is formulated to remain pliable after curing — it moves with the leather rather than becoming a rigid patch that cracks again under the same mechanical stress. On a banquette that receives daily use, this flexibility is not optional; it is what determines whether the repair holds over time. The filler was worked into the crack pattern, built up in thin layers, and allowed to cure between passes.
Texture Refinement
After filling, the repaired areas were refined to match the grain texture of the surrounding undamaged leather. A filled area that is smooth where the surrounding leather has texture reads as a patch rather than a repair. This refinement step blends the repaired zones so that the grain is consistent across the entire panel — visible in raking light as well as at normal viewing angles.
Custom Cream Color Matching
Matching cream leather on a large, continuous surface requires precision. There is no margin for a slight tonal shift — too warm reads yellow, too cool reads grey, too bright reads artificial. The target was the original factory cream: a warm, slightly off-white tone visible on the least-affected areas of the backrest where soiling had not penetrated as deeply. Custom pigment was blended on-site, tested on a small area, and adjusted until the match was accurate before any broad application began.
Full Color Application
The custom cream color was applied across all leather surfaces in controlled layers — seat panels, backrests, the corner junction, and the outer sides of the unit. Building color in layers rather than a single heavy application produces a result that looks like leather rather than paint. Each pass was allowed to absorb before the next was applied. The tufted grid seams were treated carefully to ensure color penetration without pooling.
Protective Topcoat & Conditioning
A flexible protective finish was applied over all recolored surfaces to seal the color, establish the correct sheen level, and provide resistance to the contact wear of daily kitchen use. The finish is breathable — it does not create a plastic seal over the leather but a protective layer that allows the leather to remain supple. A leather conditioner was applied as a final step to replenish moisture in the hide and support the long-term flexibility of the restored surface.
Color Matching on Cream Leather
Cream and ivory leathers are among the most demanding for color matching. The eye is sensitive to tonal variation on neutral backgrounds in a way it is not on saturated colors — a slight warm shift reads immediately as yellow, a slight cool shift reads as grey. On a large, continuous surface like a banquette, these variations are visible even at a glance, and there is no way to limit the comparison area.
The starting condition here was leather that had shifted noticeably toward yellow-tan from its original cream. The correct target was not pure white — which would look stark and unnatural against the aged seam stitching and grain pattern — but the original factory cream: a warm, slightly off-white tone that reads as clean without reading as artificial. That original color was still visible in the backrest panels, which had experienced less body contact and had retained more of the original finish.
The color was developed by referencing those less-affected areas, blending until the formula read naturally when tested on a small area. Only after that match was confirmed did broad application begin. On a surface where any variation will be immediately visible, there is no value in rushing the matching stage.
Protective Finish
After color was applied across all surfaces, a flexible protective topcoat was applied to seal the color and establish the final appearance. On a built-in seating unit that receives daily use — people sitting down, leaning back, eating at the table — the protective finish takes considerably more mechanical stress than a sofa or chair. The flexibility of the topcoat is not a secondary concern; it determines whether the finish remains intact or begins cracking again within months.
The finish is breathable and compatible with the leather's natural movement. It also makes the surface practical to maintain — a clean damp cloth removes most daily kitchen soiling from the finish surface, and conditioning every 6 to 12 months extends the life of both the color and the leather itself. Regular conditioning is the single most effective thing an owner can do to prevent the drying and cracking cycle from recurring.
Final Result
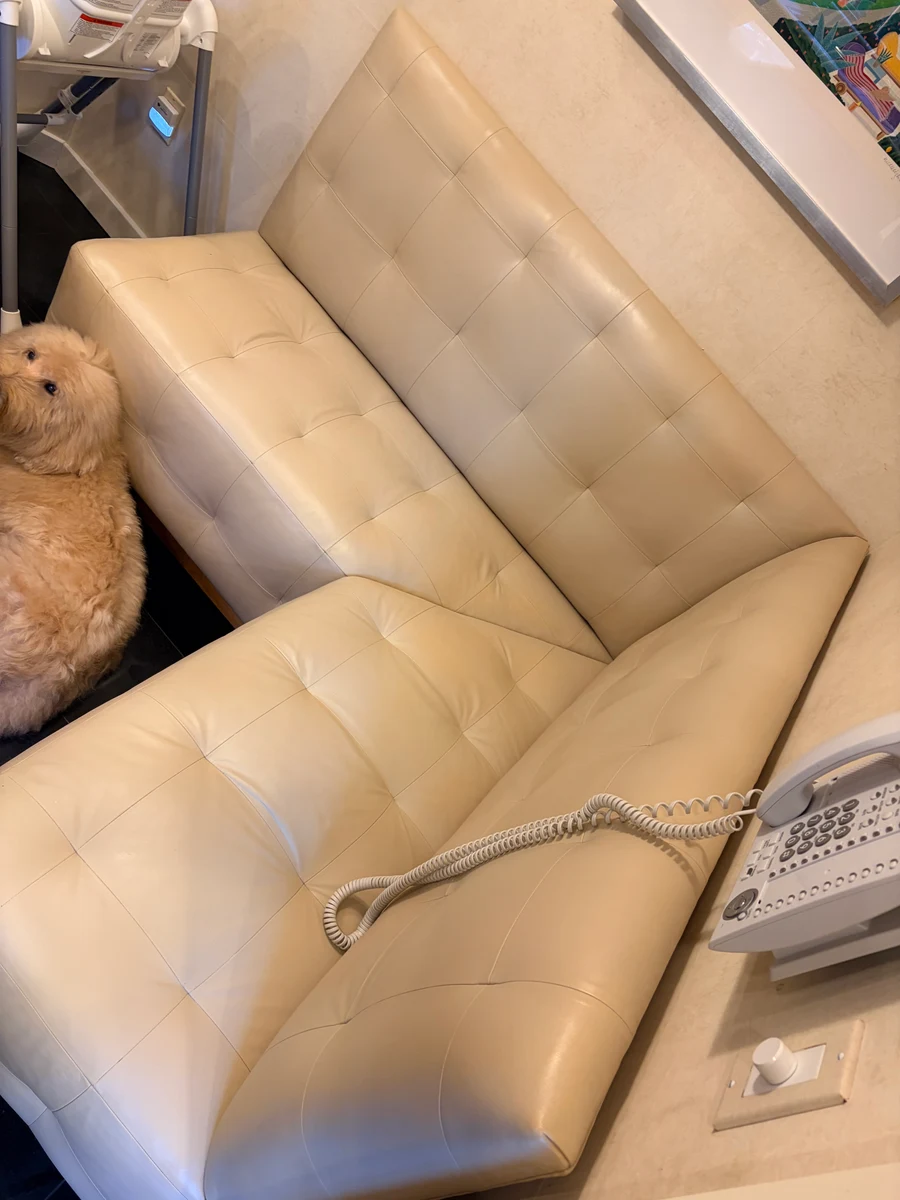
The restored banquette has an even, clean cream color across all surfaces — seat panels, backrests, the corner section, and the outer sides. The cracking is gone. The yellowing is corrected. The leather is supple from conditioning, and the protective finish gives the surface the same kind of practical resistance that it had when the banquette was new. The transformation from the starting condition was significant — visible in the before and after photographs — and was accomplished without touching the structure, removing a single screw, or disrupting the kitchen for more than a day.
Leather Banquette Restoration Across New York
Leather & Vinyl Care is a mobile service that comes to your home and performs all restoration work on-site. For built-in furniture — banquettes, booth seating, window seat upholstery — this approach is the only practical one. We bring the materials, the equipment, and the process to the piece, not the other way around.
We work throughout New York City and the surrounding area. Whether the piece is in a Manhattan apartment kitchen, a Brooklyn townhouse, a Queens home, or a property on Long Island — we schedule appointments to your location and complete the work in a single visit in most cases. Built-in seating, dining banquettes, breakfast nooks, and restaurant-style booth seating are all within the scope of our leather furniture repair and leather color restoration services.
Related Services
- Leather Furniture Repair → on-site repair for sofas, chairs, banquettes, and upholstered furniture
- Leather Re-dyeing & Color Restoration → custom pigment matching for faded, yellowed, or discolored leather
- Commercial Seating Restoration → restaurant booth repair, commercial leather seating, multi-unit pricing
- Leather Cleaning & Conditioning → deep cleaning and conditioning to maintain restored leather
- Foam Cushion Replacement → when the underlying foam needs replacing alongside the leather restoration
Have a Leather Banquette or Built-in Seating That Needs Restoring?
The fastest way to understand what's possible is to send photographs. Text us images of the damage and a brief description of the piece — we'll give you an honest assessment and a price estimate, usually within a few hours. We serve homeowners and properties throughout New York City and Long Island.
Frequently Asked Questions
Can a built-in leather banquette be restored without removing it?
Yes. Built-in banquette restoration is performed in place — the structure stays exactly where it is. Cleaning, surface preparation, crack filling, color application, and protective finishing are all done on-site. Nothing is disassembled or removed. This is one of the primary advantages of professional leather restoration over reupholstery: the work comes to the furniture, not the other way around.
How much does leather banquette restoration cost in New York?
A full restoration of a built-in leather banquette — including deep cleaning, crack repair, color matching, recoloring across all surfaces, and a protective topcoat — typically ranges from $400 to $900 depending on the size of the unit, the extent of surface damage, and color complexity. Single-section banquettes or spot repairs start lower. All estimates are provided before work begins. Text us photos for a specific quote.
How long does leather banquette restoration take?
A full restoration of an L-shaped kitchen banquette is typically completed in a single day — usually 4 to 6 hours on-site. The work follows a sequence: cleaning and drying time, surface preparation, crack filling and curing, color application in layers, and a final protective coat. The piece can be used normally the following day once the finish has fully cured.
Can cracked leather banquette seats be repaired without reupholstery?
In most cases, yes. Surface cracking — even when widespread across seat panels — is a finish failure, not a failure of the hide itself. Flexible leather filler compounds are used to consolidate and smooth the cracked surface. Once filled and dried, the surface accepts recoloring normally. Reupholstery is only necessary when the leather itself has structural tears or when the underlying foam has failed. Surface cracking and color loss are restoration problems, not replacement problems.
Why is my cream leather turning yellow?
Cream and ivory leather yellows over time primarily from three causes: absorption of body oils into the surface finish, accumulation of airborne soiling that settles into the pores of the finish, and the natural aging of the dye layer without regular conditioning. In kitchen environments, cooking oils and food particles can also contribute. The yellowing is mostly surface-level and responds well to professional deep cleaning followed by color restoration. The original cream is usually still recoverable.
How do I maintain a restored leather banquette?
The most effective maintenance routine is regular wiping with a clean damp cloth after meals, and a professional-grade leather conditioner applied every 6 to 12 months. Avoid silicone-based products, which sit on the surface and prevent moisture exchange. Avoid harsh cleaning chemicals — they strip the finish and accelerate drying and cracking. Promptly wiping up spills rather than letting them soak in extends the finish significantly. If the leather feels stiff or looks dull between conditioning cycles, that is the signal to condition.
Is it worth restoring a built-in leather banquette instead of replacing it?
For most built-in banquettes in good structural condition, restoration is the better option by a significant margin. The cost of re-upholstering a built-in runs from several hundred to several thousand dollars depending on complexity and the upholsterer, plus the disruption of the workspace during the job. Restoration returns the original leather to a clean, uniform appearance in a single day at a fraction of the cost. The original leather is also often preferable to a replacement — it has already conformed to the frame and developed a natural softness that new material takes time to acquire.
Related Reading
- Restaurant Booth Leather Repair in Midtown Manhattan, NYC →
- Mitchell Gold + Bob Williams Hunter Leather Chair Restoration in NYC →
- Luxury Leather Furniture Color Matching & Restoration in New York →
- Teal Leather Sofa Color Restoration in NYC →
- Vintage Chesterfield Chair Leather Restoration in NYC →
- Leather and Vinyl Repair vs Replacement — When Is Restoration Worth It? →